How to Write a Practical Project Plan in 6 Simple Steps for Freelancer

In recent times, freelance jobs seem to be as prominent as ever before. More and more people want to become a freelancer or start freelancing. Many in-demand types of freelance jobs are developer (coder or programmer), writer, translator, designer, marketer, etc. However, the work of writing a project plan is always a challenge for any freelancer, especially those who are new in the market. In this blog, we would like to share with you a great way to write a successful practical project plan in six simple steps. This may be helpful guidance to help you complete the first steps easily and quickly.
1. What is a practical project plan?
A practical project plan is one of the most important keys to a successful project. This may be the first step after signing the contract between your freelancer and your client. A practical project plan is a wide range of detailed information that will help you get an overview of the project. For example, project goals, project process, the resources needed, the tasks, and the end products. A good project plan keeps you focused and stays in the right orientation to get the highest customer satisfaction.
2. How to Write a Practical Project Plan in 6 Simple Steps for Freelancer
2.1 Define project goals and outline the project
The first step of any project is to define project goals. Each project has its stakeholders such as the project sponsor, the customer who receives the deliverables, the users of the project output, or the project manager and project team. With any project you join, you need to know who the key stakeholders are first. The evaluation will decide whether the project is successful or not. So if you want to succeed in your project, the important thing is to conduct a key stakeholder interview to get the essential information related to their requirements, needs, and expectations.
You can review some of the following questions to discuss with stakeholders:
- How do we write a project plan that aligns with company goals?
- What do stakeholders expect? What will be expected from them?
- How will you measure success?
- What are your resources?
- What assets or deliverables are expected out of this project?
- What is the value proposition of the project?
After having a conversation with stakeholders, you will get an overall understanding of the project. Note that you have to know the clear project goals to make sure that you don’t miss out on crucial information. You can use the SMART principle to arrange, and create a set of goals that are easy to measure and identify. Then it’s time to outline the project.
You need to record all of the key project goals in the project plan. It can be useful during the project time, or even after launching the products. Let’s write down the project goals on a project plan board and connect them to the stakeholder requirements they need. From there, build out the structure, milestones, and tasks it takes to reach those goals. Prefer specific and clear details because it helps you and your clients a lot. You have completed the most difficult part of the project planning process. Let’s move on to the next step.
2.2 Create a project scope document/statement
After your outlined project, you establish an official project scope document or statement of work. You can divide tasks into deliverable tasks and tasks that must be completed yourself. For each task, determine the amount of time it’ll take, the required resources, the method of implementation, and who will be responsible for performing it.
Gather and record all of the project details in one system, software, or file. There are many available tools or software in the market. You can consider and choose the best project management tool to make your project document easily shareable and avoid wasting time and resources because of miscommunication. Doing this will get everything organized, make sure that everyone is updated, and stay on the same page anywhere at all times. Moreover, project members will be accountable, and try their best to complete work effectively.
2.3 Craft a detailed project schedule
 Image source: https://www.wrike.com/blog/how-to-write-a-project-plan-easy-steps/
After determining the project details about goals, resources, and milestones, you should arrange your project in a specific schedule. A Gantt chart can be a helpful tool that helps you easily visualize your project timeline. You can get a complete view of the project’s progress, work scope, the resources needed, or even something unreasonable existing.
Besides a list of main tasks, you can break them up into other subtasks. Subtasks need to be completed before other tasks can begin. It will take less time and support you to perform the main tasks easily and quickly. Some factors you should pay attention to when crafting a detailed project schedule are:
- Tasks: The individual tasks require each member to carry out to achieve project goals.
- Subtasks: You just spend a little time, these help you take on a task. Divide into smaller steps will support you to complete the larger task easily.
- Milestones: Major stages or events in your project can become check-in points to mark the project in different phases of development.
2.4 Define the roles, responsibilities, and resources
You need to define the roles and responsibilities, and the resources needed to complete the project particularly. It's difficult to succeed if you work alone throughout the project without any help. Resources include other project members, equipment, technology, and budget to ensure the completed project.
Human resources are always one of the most important factors that affect the success of each project. So you should build a specific human resource plan for your project. Identify the names of individuals and organizations that are leading responsibility. From that, describe their roles and responsibilities on the project particularly. After that, determine the number and type of skill of people needed to carry out the project. Doing this allows you to maximize the full power of a team to achieve the best result.
A RACI chart can be an essential tool that will help you determine specifically who will do what for the project. It's a matrix of all project tasks, paired with who's responsible (assigned to complete the work), accountable (has yes/no/veto power), consulted (needs to approve or contribute), and informed (needs to know about the action or decision). You can find out more about the RACI chart in the image below.
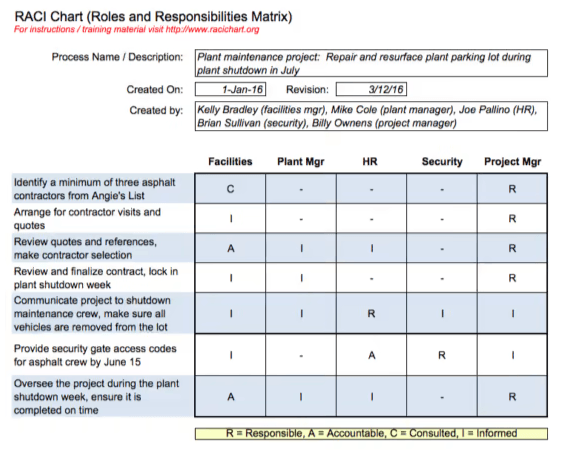 Image source: https://www.wrike.com/blog/how-to-write-a-project-plan-easy-steps/
An ideal RACI chart allows you to get an exact overview of the entire project tasks. Creating a great RACI chart requires you to put the right people in the right place. You need to understand each member about their characteristics, abilities, and expectations. Besides that, all project members have to agree with their assigned task, and feel comfortable and satisfied. Make sure to choose the best member for each role, so they try their best to do tasks well.
2.5 Define the communication and check-in process
No one can deny the importance of communication in life and business. Miscommunication negatively affects the efficiency of collaboration between individuals, individuals, and organizations. The ideal working environment is where every member can connect and interact with each other easily, and stay focused on the one mutual objective to bring out an outstanding outcome.
So before starting each project, you and your team need to select the proper method of communication and check-in process. This allows the following processes to be conducted smoothly. You can gather all project parts in just one location. It can be documents, conversations, tasks, due dates, updates, or reports that are stored in a sheet, software, or any collaboration tool. Ensure it is easily shareable to help every project member follow up, track progress, update, or edit if needed. It's a great way to remove unnecessary barriers, so people can access information promptly and accurately.
2.6 Contingency and launch plan
Besides an official plan, you also need to create a backup plan to prepare for unforeseen events or emergencies. Imagine and identify potential issues that might occur during the process of your project. You can discuss and communicate about risks, so the entire team will take ideas to resolve them together.
After brainstorming the most comprehensive picture of the project plan, last but not least, let’s spend some time planning the launch of the product. This can be a summary of the whole project process to present key stakeholders with what you did and what are the results and deliverables.
You can redetermine all factors of the project that are mentioned in these above steps. You can also share images of Gantt charts, RACI charts, or any tool that helps everyone communicate and manage throughout the project. You will get some questions and recommendations to improve the quality of the project plan to a higher level.
Conclusion
Now you know how to write a practical project plan in six simple steps. Depending on your requirements and expectations, you can customize to build the best suitable project plan. There are multiple templates for each type of project plan, so you can review and pick one of them to use. Let’s make the time of project planning interesting and easier with some suggestions from our blog.